I’ve previously talked about the importance of preparing for plyometrics. Here is a quick recap of the process:
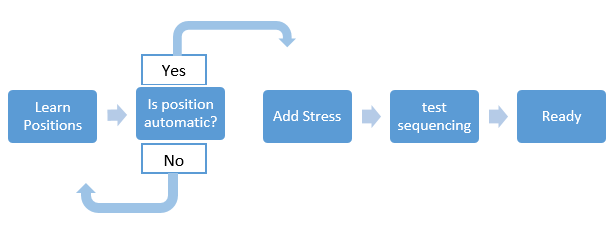
I cannot stress enough the importance of preparing properly. You will achieve greater gains if you have a solid foundation. Not only do the basics allow you to build a better structure, they also assist in injury prevention (1). You would not build a house without a solid foundation, and you would not learn to drive by racing. In the same way, jumping straight into plyometrics without preparation is likely to have dissatisfying results.
It is easy to extend the metaphor.
Building a foundation is learning to stabilize in the different positions of a plyometric movement.
Driving starts off with you moving very slowly, then as your ability improves you can drive faster. Plyometrics are the same, and your athletes need to learn the movement slowly before they can add speed.
Besides strength training, plyometrics are one the most valuable training methods for our athletes. They have a wide range of performance benefits (2):
- Improved sprinting
- Increased jumping
- Enhanced endurance
- Reduced injuries
Another reason I find plyometrics so valuable for youth soccer players is their accessibility, which makes it easier for coaches to implement them during a warm-up.
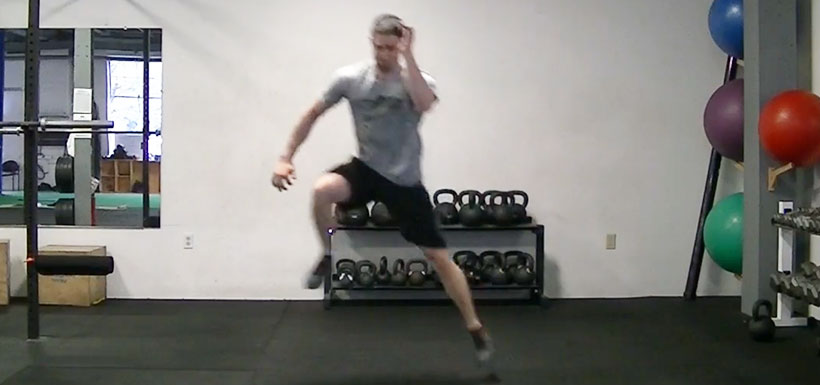
You can also get more dynamic with them by combining multiple plyometric movements into 1 drill. For example, here is Peak Condition athlete Brittany Persaud, a Guyana soccer national team player, getting after a 1xLeg depth drop + heiden.
I consider both drills above to be advanced because they involve multiple planes of movement (vertical and lateral) and high to very-high eccentric demands or landing stress. In a full plyometric exercise, the ground reaction force — the amount of force the ground exerts back on your body — can be 7 times your bodyweight. That is a lot of load to absorb quickly and repetitively, and to make sure your athletes are ready for these kinds of advanced drills, you should take them through a system of progression based on the training effect.
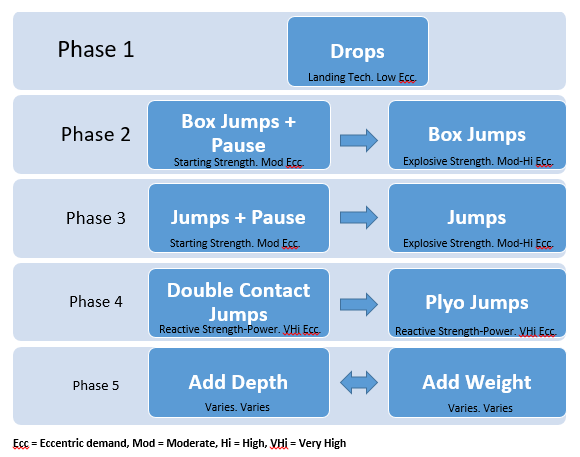
The training effect model lets us know exactly what attribute an athlete is training and how to prepare them for more stressful drills.
It can be tempting to skip phases 1-3, but remember that it is your foundation. You may not need to spend more than one training session on them, but it is important to verify that you are building on a foundation of concrete, and not of sand.
Higher phases are more complex and elicit greater landing stress, but are not always what an athlete needs. If starting strength needs development, Jumps + Pause may be the most valuable. On the other hand, if you have an upcoming match and want to avoid soreness, Box Jumps would be a great choice, as they limit the eccentric demand which causes soreness.
The training effect model is the first step in deciding where an athlete should start, but doesn’t point specifically to which movement they should start with. For example, Jumps to Box could be 1 foot or 2, a forward Jump or a side-to-side jump. There are two primary variables you should use to select an appropriate movement.
Direction and number of legs (1 or 2).
For directional progression we use this model:

When determining 1 or 2 legs we suggest using our stability circuits to determine if an athlete is ready for single leg plyometrics.
Because some of us are more visual, we have 2 videos showing possible progressions.
The entire progression of our training effect model:
How you can create progressions from one phase of our training effect model by changing direction and number of legs:
The second video is a better representation of what we use for youth soccer players (11-16 yrs) compared to the first video. We want to expose them to a myriad of stressors (directional and 1 or 2 legs) while keeping them within their ability to move proficiently and powerfully.
I often see young soccer players using the highest levels of the training effect model, but only with 2 legs and vertical movement. There’s nothing inherently wrong with doing that, but it’s likely that the intended training effect is not being achieved due to poor movement or too much eccentric stress. In other words, it is not doing what they think it is doing for them.
We’ve found that youth athletes need a few years of experience before using phases 4 and 5, but can still gain the benefits of plyometrics using phases 1-3. Using the additional variables of direction and number of legs provides nearly endless options for complexity and intensity in those first 3 phases — the only limit is your creativity.
The final variable is the number of reps and sets. Besides phase 1, all reps should be under 8 and most of the time under 6. Keeping rep ranges below 6 allows for maximal output for rep. It’s important to realize plyometrics are not designed to be aerobic. In fact, they are the exact opposite, anaerobic. The only case when that is not true is during aerobic plyometrics, but that is an article for another day. Simply put, if you are breathing hard and doing plyometrics your reps are too high, or rest is too short.
Phase 1 is still primarily a learning phase and not a stress phase, which allows for higher volume. Sets will be highly variable (between 1-6) depending on the athlete’s previous exposure. A good general rule is to start low and increase 1-2 set each week for 4 weeks.
Recap:
- Prepare your athletes for plyometrics
- Determine appropriate phase for them using the training effect model
- Add directional changes to the phase
- Progress to 1 leg movements
- Increase number of sets
- Re-assess, and return to step 2
The goal of plyometrics is to become more powerful and efficient. Using phases that are too advanced will lead to a breakdown in mechanics. The loss of mechanics means you lose the intended training effect and won’t develop power and movement efficiency. When in doubt use a lower phase and maintain high-quality movement.
A quick side note on terminology. Traditionally, jumps = 2 legs and hops = 1 leg. We’ve found that most of our athletes view a hop as “a less intensive jump,” instead of a 1 leg jumping action. Consequently, we call them 1xleg jumps.


